After this article you’ll never go back to a WordPress migration plugin to move from one provider to another. Ever. As mentioned above you need to have a server provisioned at xCloud and integrated with Cloudflare. And you’ll need SSH and sFTP access to both servers.
These steps demonstrate how to move a WordPress site from a Gridpane managed server to an xCloud managed server, but the steps can be adapted to pretty much any source hosting provider:
1. Site Preparation
The first task is to disable all security and caching related plugins. Depending on where your current site is hosted, this might all be done within WP-Admin or in the case of Gridpane, it’s in the Gridpane UI for your site. This includes plugins/features like Fail2Ban, WordFence, Redis Object Cache, NGINX page caching, etc. Disable everything that is cache or security related. If you have a site-level 7G WAF, that will not cause an issue. You can leave it live.
2. Export Your Database
Use an sFTP client and navigate to the /var/www/sitename folder on your source server. Copy the wp-config.php file to a folder on your local computer. I’d recommend creating a folder for this site migration to keep things organized. Open the source site wp-config.php file and get the db name, username and password.
Next open terminal (macOS). SSH into your server (ssh root@ipaddress). Again, this assumes you have SSH access to source and destination servers configured.
Type the following command where you replace USER_NAME and DATABASE_NAME with the info from the wp-config.php file from your source server. Replace sitedatabase.sql with the desired filename.
mysqldump --no-tablespaces --opt -u USER_NAME -p DATABASE_NAME > sitedatabase.sql*Note: This command will not include table spaces. The PROCESS privilege is new as of MySQL 5.7.31 and MySQL 8.0.21 and is required to export table spaces. So to get around this, we tell the export process to skip them as they’re irrelevant for WordPress sites.
You will be prompted to enter the password, which is also contained in the wp-config.php file.
3. Copy the Exported Database
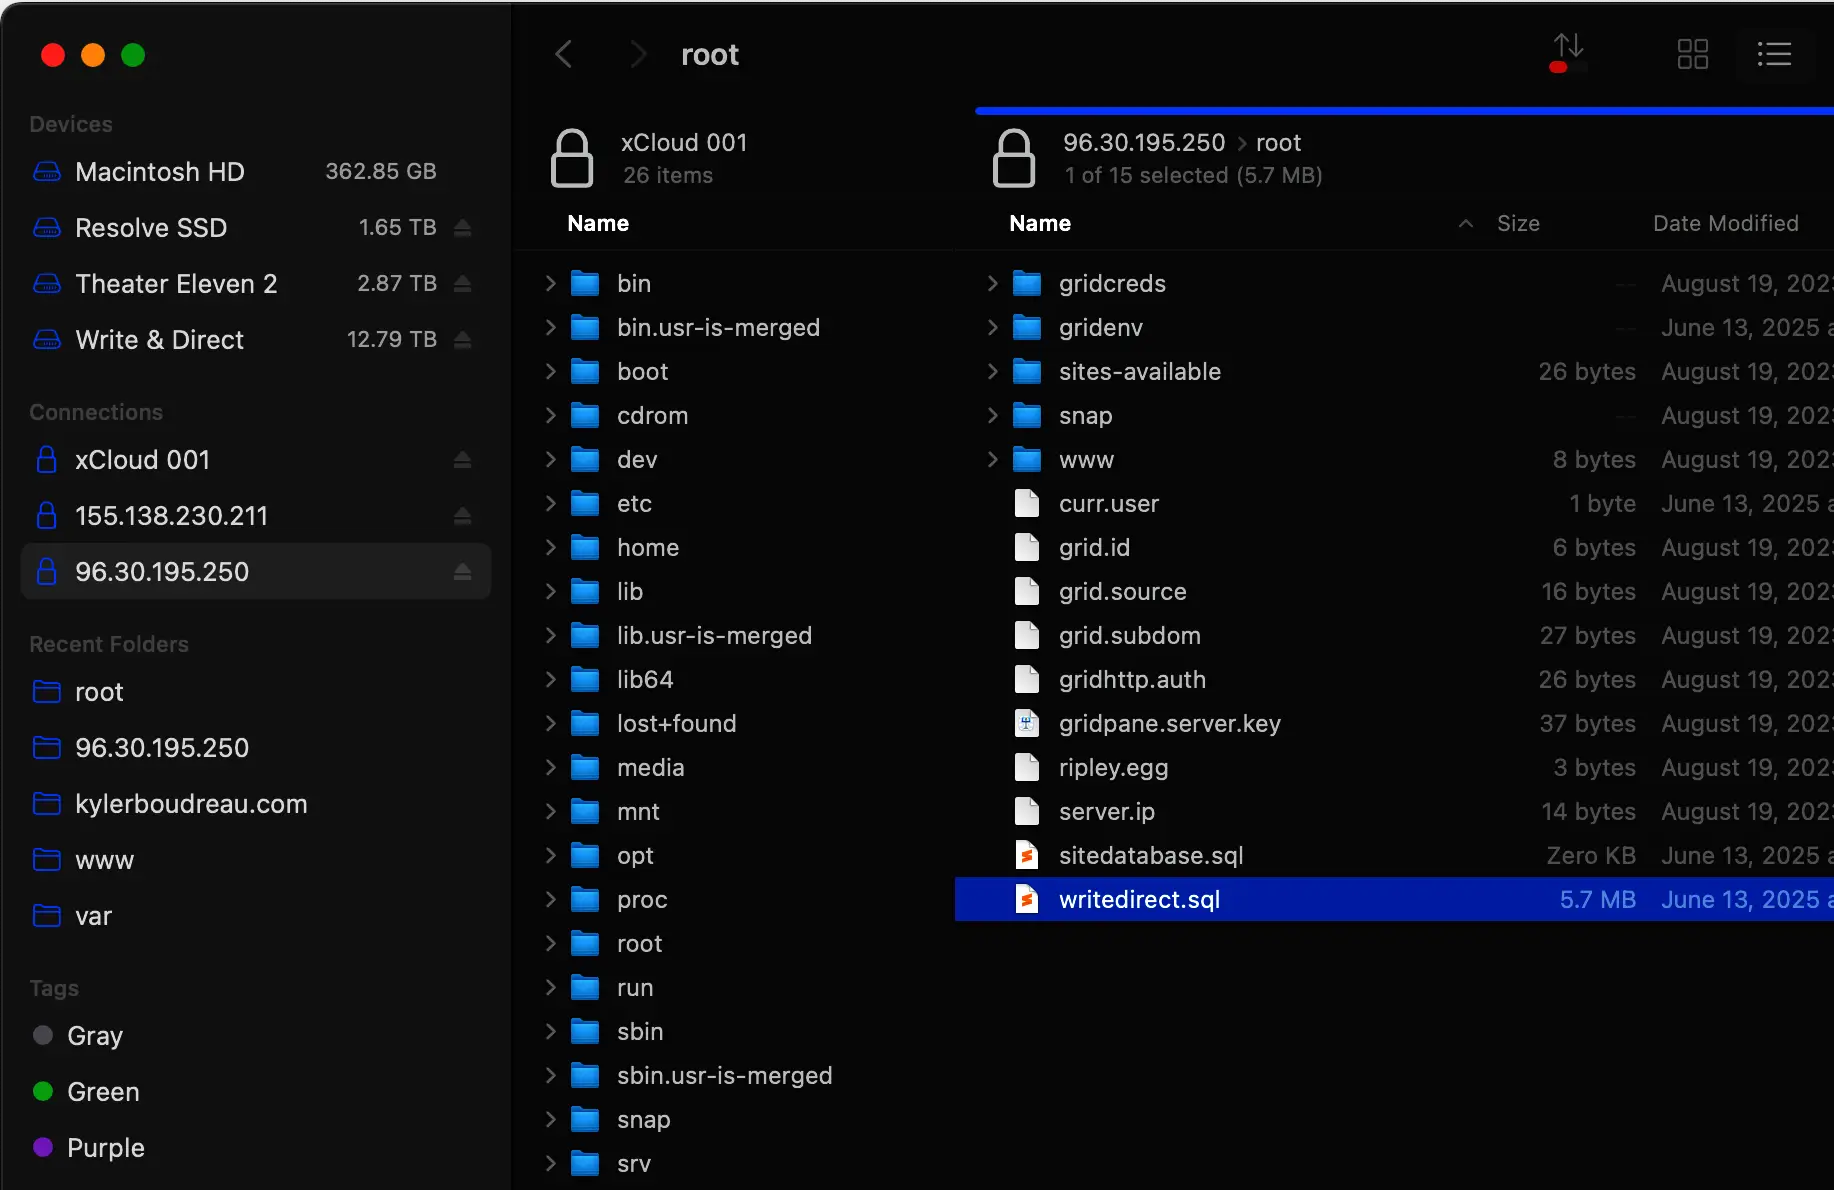
You can find the exported database file with an sFTP client like Forklift 4 from Binary Nights (for macOS users). Note: The sql file will be in the root folder on your server. Not the root of your server but the root folder. If you ran the mysql command in any other location than root, look in that folder for the sql file. Locate the file and copy this to your computer.
4. Zip Up WordPress Files
We need to zip up your WordPress files. We’ll do this from the command line, but first you need to determine the file structure of your source installation. Some hosts store all the WordPress files in the site root folder:
Example: /var/www/yoursite.com.
Other hosts store them in public_html or in the case of Gridpane, an htdocs folder. Why does this matter? We need to zip the folder that contains the files. Navigate on the command line to the parent folder of the folder containing your site files. For Gridpane this would be:
cd /var/www/sitename.comNow we will zip up the htdocs folder. Make sure you remove any archived backup files or other space clogging clutter that might be hanging around. Then type the following:
zip -r choosefilename htdocs*Note: Again, if your site files are in another folder besides ‘htdocs’ then use the name of that folder in the above command.
5. Copy the Zip File
You’ll see the zip file in the ‘yoursite.com’ directory. Copy this to your local computer. And yes, there are ways to send this directly to another server, but for this lesson we’re just keeping it easy. At this point you should have both a sitename.sql file and now the sitename.zip file along with your source wp-config.php. Cool? Let’s setup the site at xCloud.
5. Install New WordPress Site on xCloud
Sign into your xCloud admin and navigate to Sites > New Site. Choose the server you want to install the site on. Then select Install New WordPress Website from the available options.
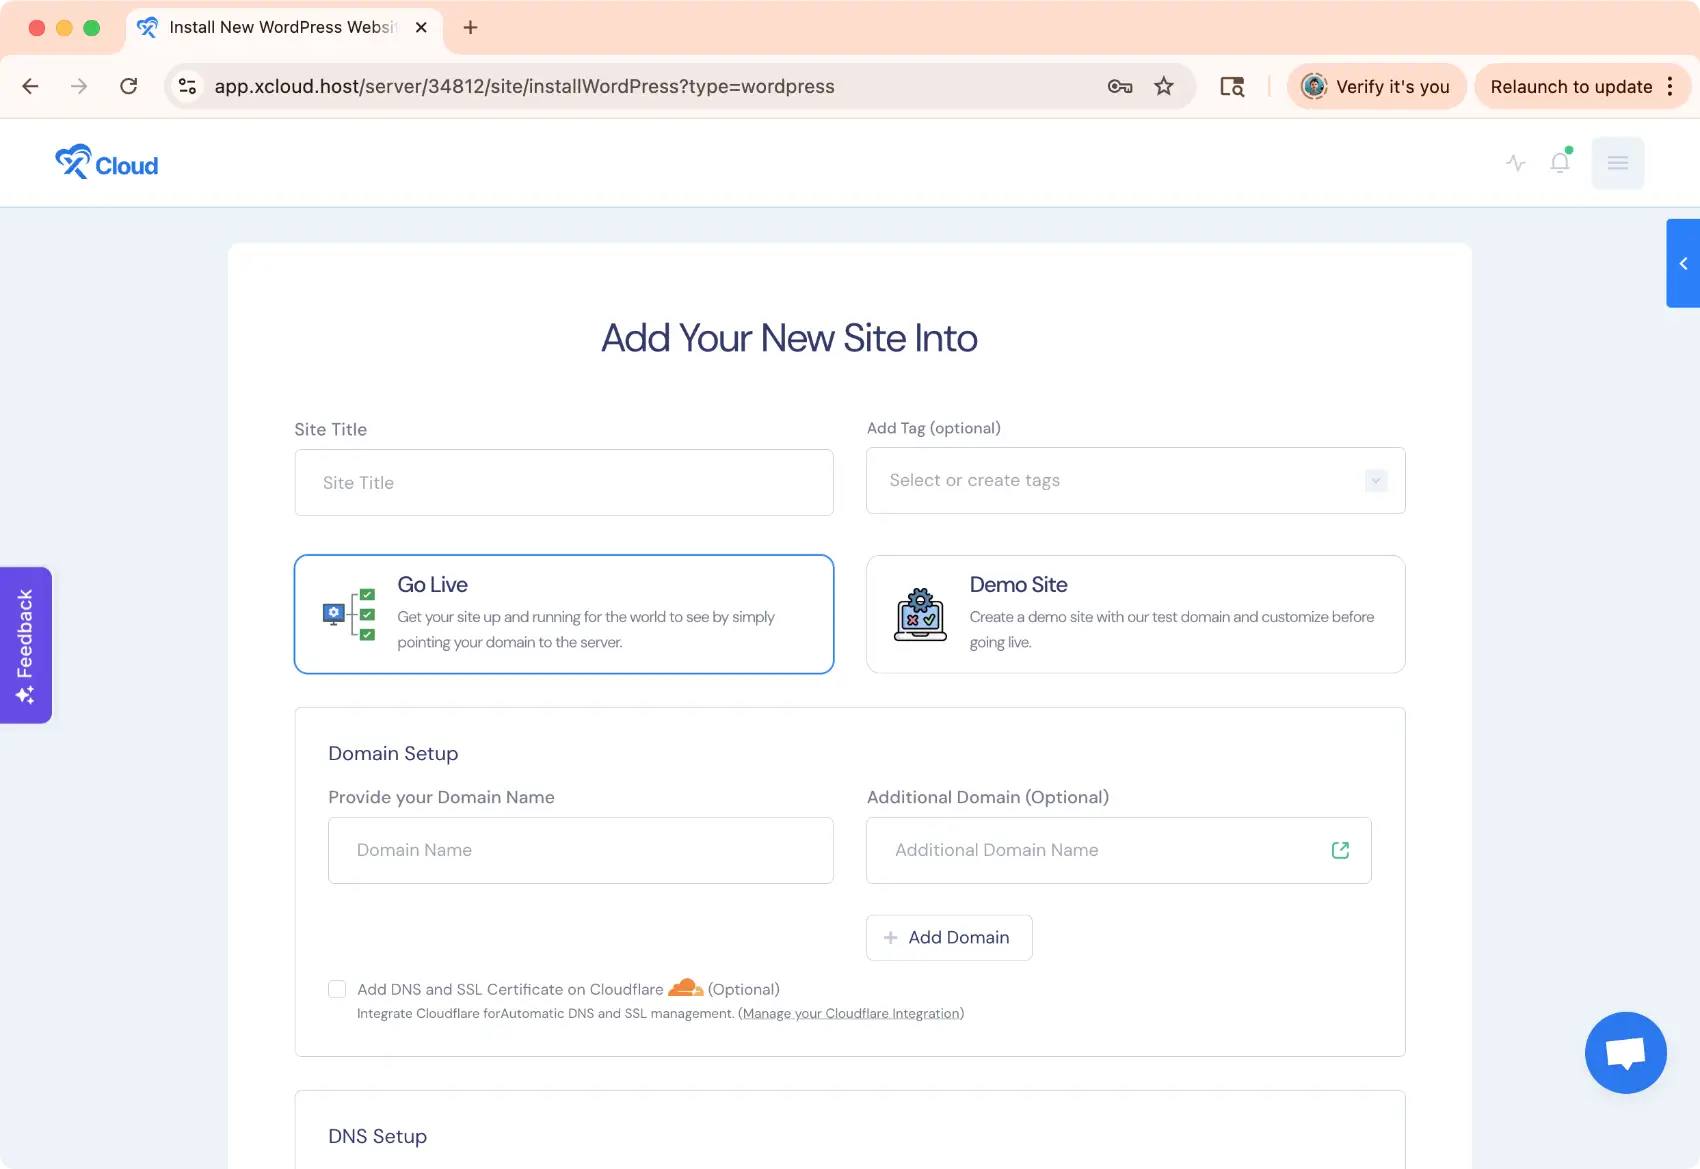
You will need to fill out and/or select the following:
Site Title: An admin title for identification.
Go Live: Do not choose Demo Site.
Domain Name: Enter your domain name.
Cloudflare: Check “Add DNS and SSL Certificate on Cloudflare.” This will also edit active records. And this assumes Cloudflare integration is configured for your xCloud server.
Disable all caching and email services for now. Optional, but I prefer to enable after importing the new site as these can involve plugins, etc.
Blueprints: Irrelevant as we will completely replace the database contents. Either choose one or disable blueprints all together.
Under More Advanced Settings take note of your database name, database username and password. We can retrieve these later if needed.
WP-Admin username and password are irrelevant as we’re replacing database contents.
After configuring these items click NEXT to install the site. You’ll be presented with a status screen that details progress. When the site completes, test in a browser. You should see it serve up with a generic template based on what you chose above. Leave the tab there and…
7. Backup WP-CONFIG and Remove Files
Connect to the xCloud server with your sFTP client of choice. Make a backup copy of the new wp-config.php file. (I recommend putting this in a sub folder with your other files called “xcloud config” so you don’t get your configuration files confused. Trust me—it’s easier to do than you might think.)
Now jump to terminal (macOS) and connect to the xCloud managed server. Type the following command where yoursite.com is the name of your website. *Note: At this time xCloud stores all site files in the root site folder vs htdocs or public_html as you’ll see with other hosts.
rm -r /var/www/yoursite.com/*Refresh your sFTP client and all the WordPress files should be gone! If you by chance forget the /* it will delete your actual site folder. Not a big deal. Just create a new one. We will fix permissions in a minute.
8. Copy Backup File & Unzip
Back in your sFTP client copy the sitename.zip file from your computer to the now empty website folder. Jump to terminal for the new server (close the other terminal session if still open so you don’t get them confused). Move to the new website folder with a change directory command:
cd /var/www/yoursite.comNow unzip the zip file:
unzip sitename.zipRefresh your sFTP client and in the case of Gridpane to xCloud you’ll now see an HTDOCS folder within your website folder. This won’t work. We must move the contents of HTDOCS to the root of the website folder:
mv -f /var/www/sitename.com/htdocs/* /var/www/sitename.com/Done! A refresh should show your WordPress files and folders in the root of your site folder. Verify the HTDOCS folder is now empty and remove.
Copy the xCloud wp-config.php you saved to this new website folder. In the case of Gridpane, it will NOT overwrite anything, because Gridpane stores all WordPress files in a sub folder while wp-config.php is always in the site root folder. If you’re coming from another host, it will overwrite and this is 100% okay. You want the new wp-config.php file.
9. Fix WordPress Site Permissions
Websites need to be owned by the site user in order to function properly. Right now, permissions will not be correct. Type in the following from terminal to verify:
ls -l /var/www/sitename.comKeep your terminal screen results up and go back to your xCloud admin in the browser. Navigate to Sites > Your New Site > Site Settings. Scroll down to Rescue Site. Enable Repair Site User, Update Directory Permissions, Regenerate Nginx Configuration and Restart Nginx.
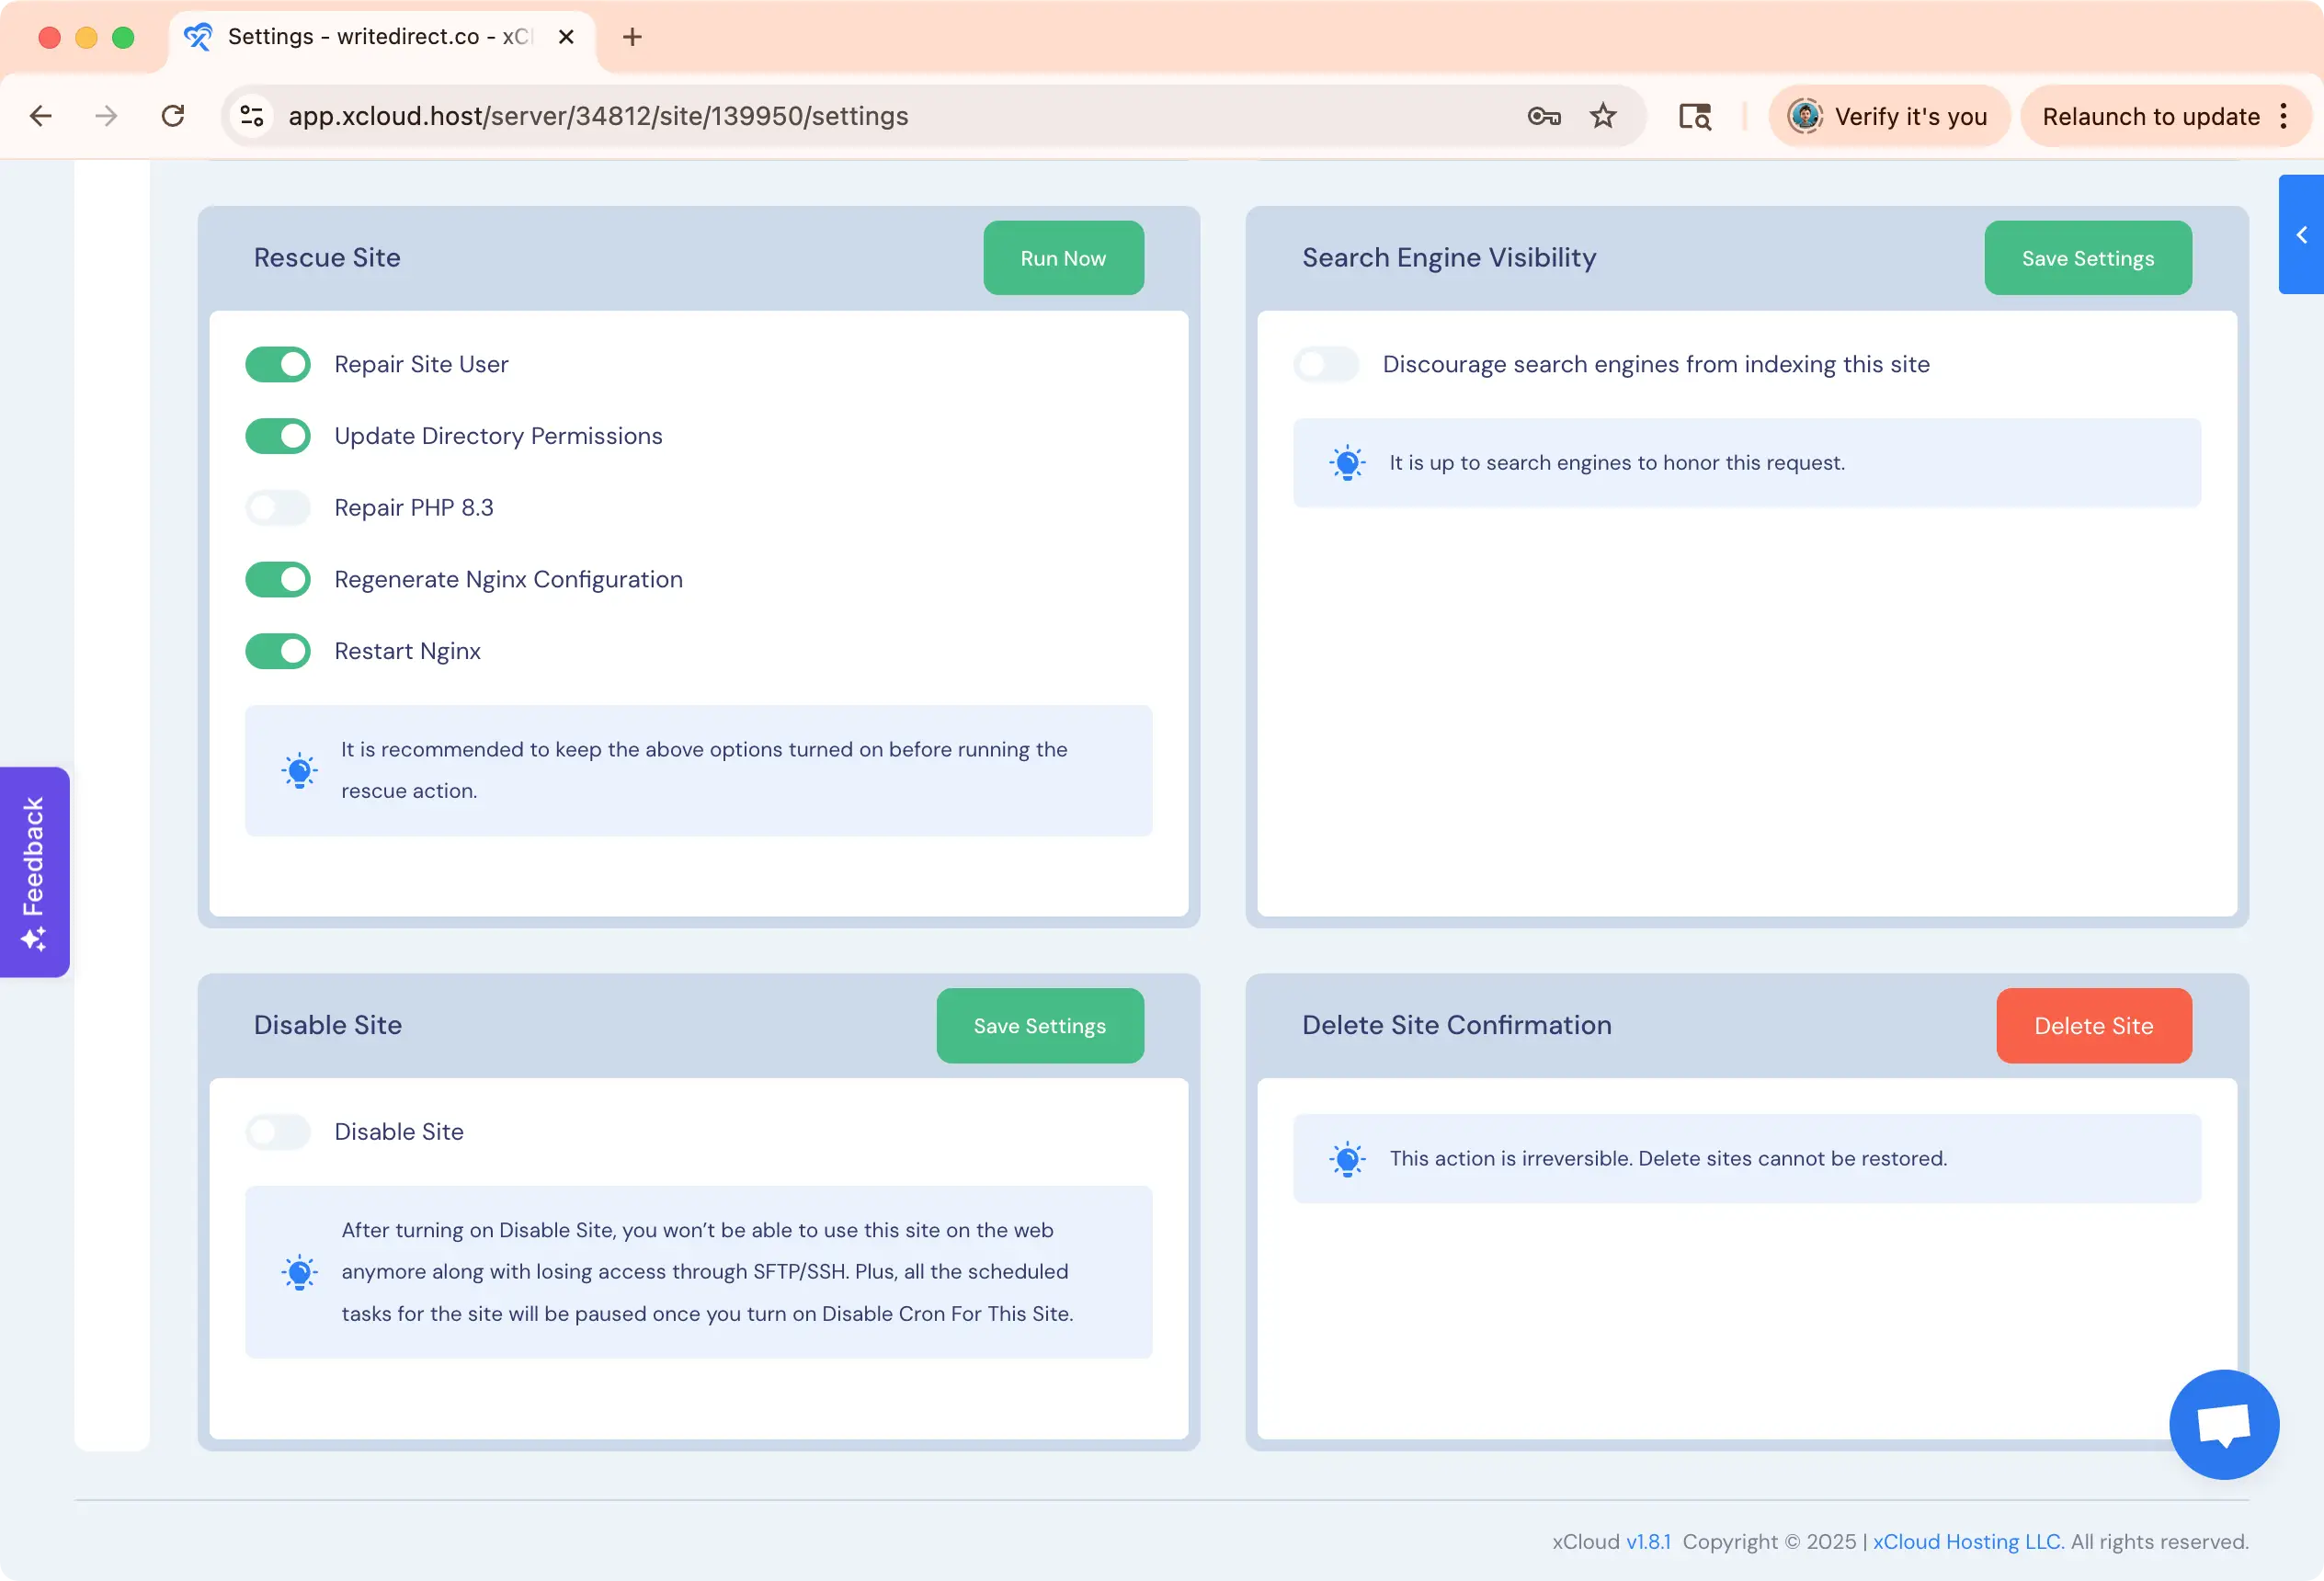
Click Run Now and confirm. When this completes use ls -l command to show the corrected user. It should match what you see at the top of Site Settings on xCloud for that particular site.
10. Import the Database
In your sFTP client, copy the sitebackup.sql file to the root of your website. Earlier we made note of the database, username and password for your new WordPress site on xCloud. If you didn’t do this simply open up the wp-config.php file we saved from the new install to retrieve.
With this information, hop back to terminal and enter:
mysql -u USER_NAME -p DATABASE_NAME < sitedatabase.sqlUse the credentials from the new wp-config.php with the filename of your source site backup file. Hit enter, type in the password, enter again. You should be returned to a command prompt. This is good!
*Note: If you receive an ‘Unknown Collation’ error, edit the sql file in a text editor like Sublime Text. Find and replace “utf8mb4_0900_ai_ci” with “utf8mb4_general_ci“. Then copy the updated SQL file back to your new site folder and run the import command again. See this Freaky Jolly article for more information.
11. Verify Database Prefix Between Sites
Some hosting providers modify the default WordPress table prefix of “wp_” with something else, citing better security. You’ll hear opinions on both sides of this. It doesn’t matter. All we need to know is this: What did our source hosting provider do and what does xCloud do?
Simply check your source and new site wp-config files to see what the table prefix is. Open them in a text editor or use nano from the server command line in terminal. You’re looking for “WordPress database table prefix” in the file. Here’s my source site in a text editor:
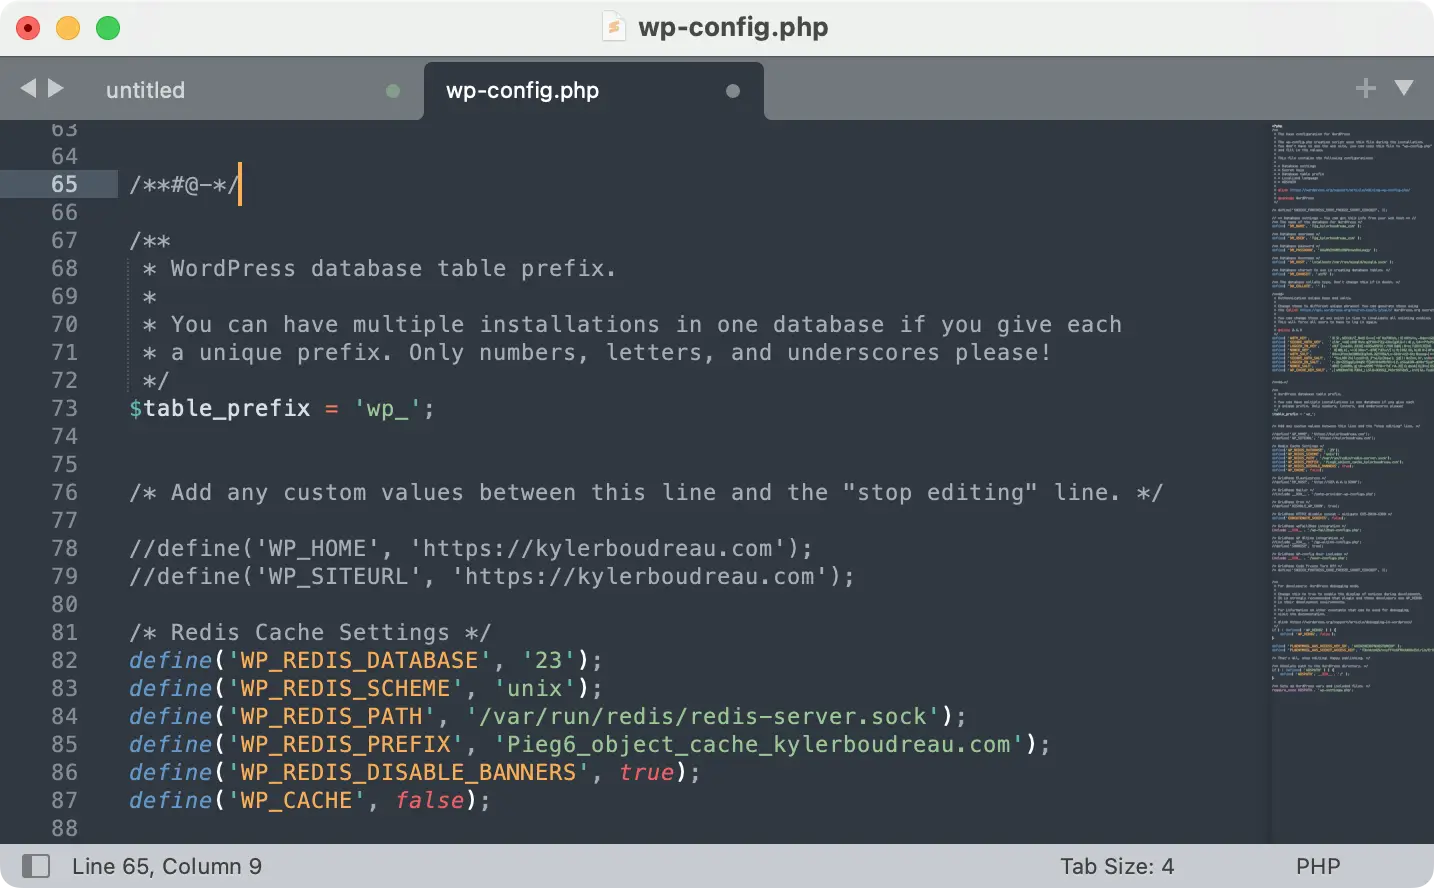
The source site using the default “wp_” prefix. Now let’s check the new site on xCloud. We’ll jump to terminal and use nano:
nano /var/www/sitename.com/wp-config.phpScroll down until you see the same section. In this example we see “eru_” is used vs the default “wp_.”
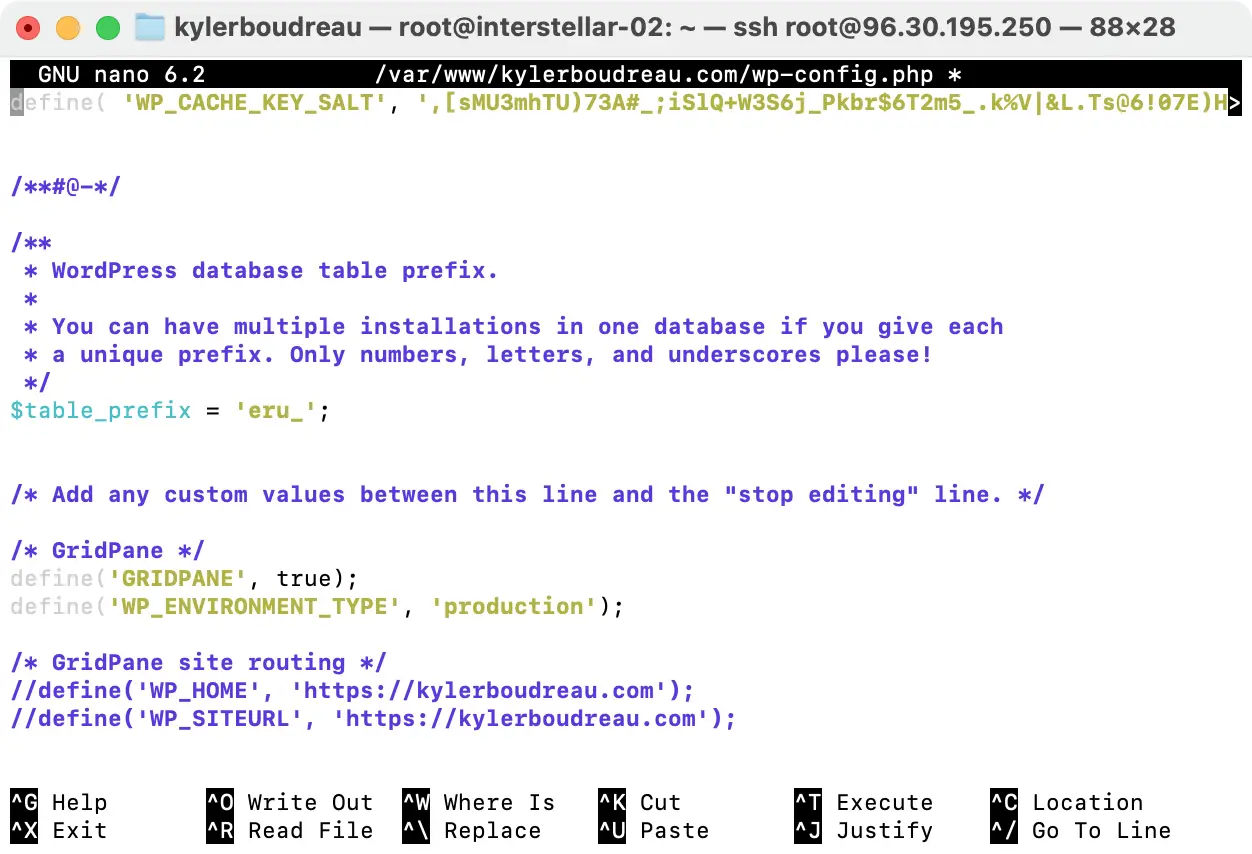
What does this mean? It means my newly restored site will not show any of my data because it’s not looking at the right tables.
The fix is easy. Change the new wp-config file to look for the “wp_” prefix instead of “era_”. In other words set the NEW site to look for the table pre-fix used by the OLD site. Make sense?
From this example we’d replace “era_” with “wp_” and save. In the nano text editor arrow up to the line and then arrow over. Correct the entry then hit Ctrl + X then Y for save then Enter for the same file name.
12. Test The New Site
We’re not done yet, but with the file permissions corrected and the database prefix adjusted it’s time to test our new site. Refresh the tab you already had up in the browser. Things should look right. If anything is off, clear cache on your browser and try again. We have a few remaining tasks to get this site 100% operational…
13. Remove Unused Database Tables
Move back to xCloud and navigate to Sites > New Site > Access Data > Database. Enable and then launch Adminer. (Note: Adminer cannot run with either 7G or 8G WAF enabled, which is why we’re tackling this first.)
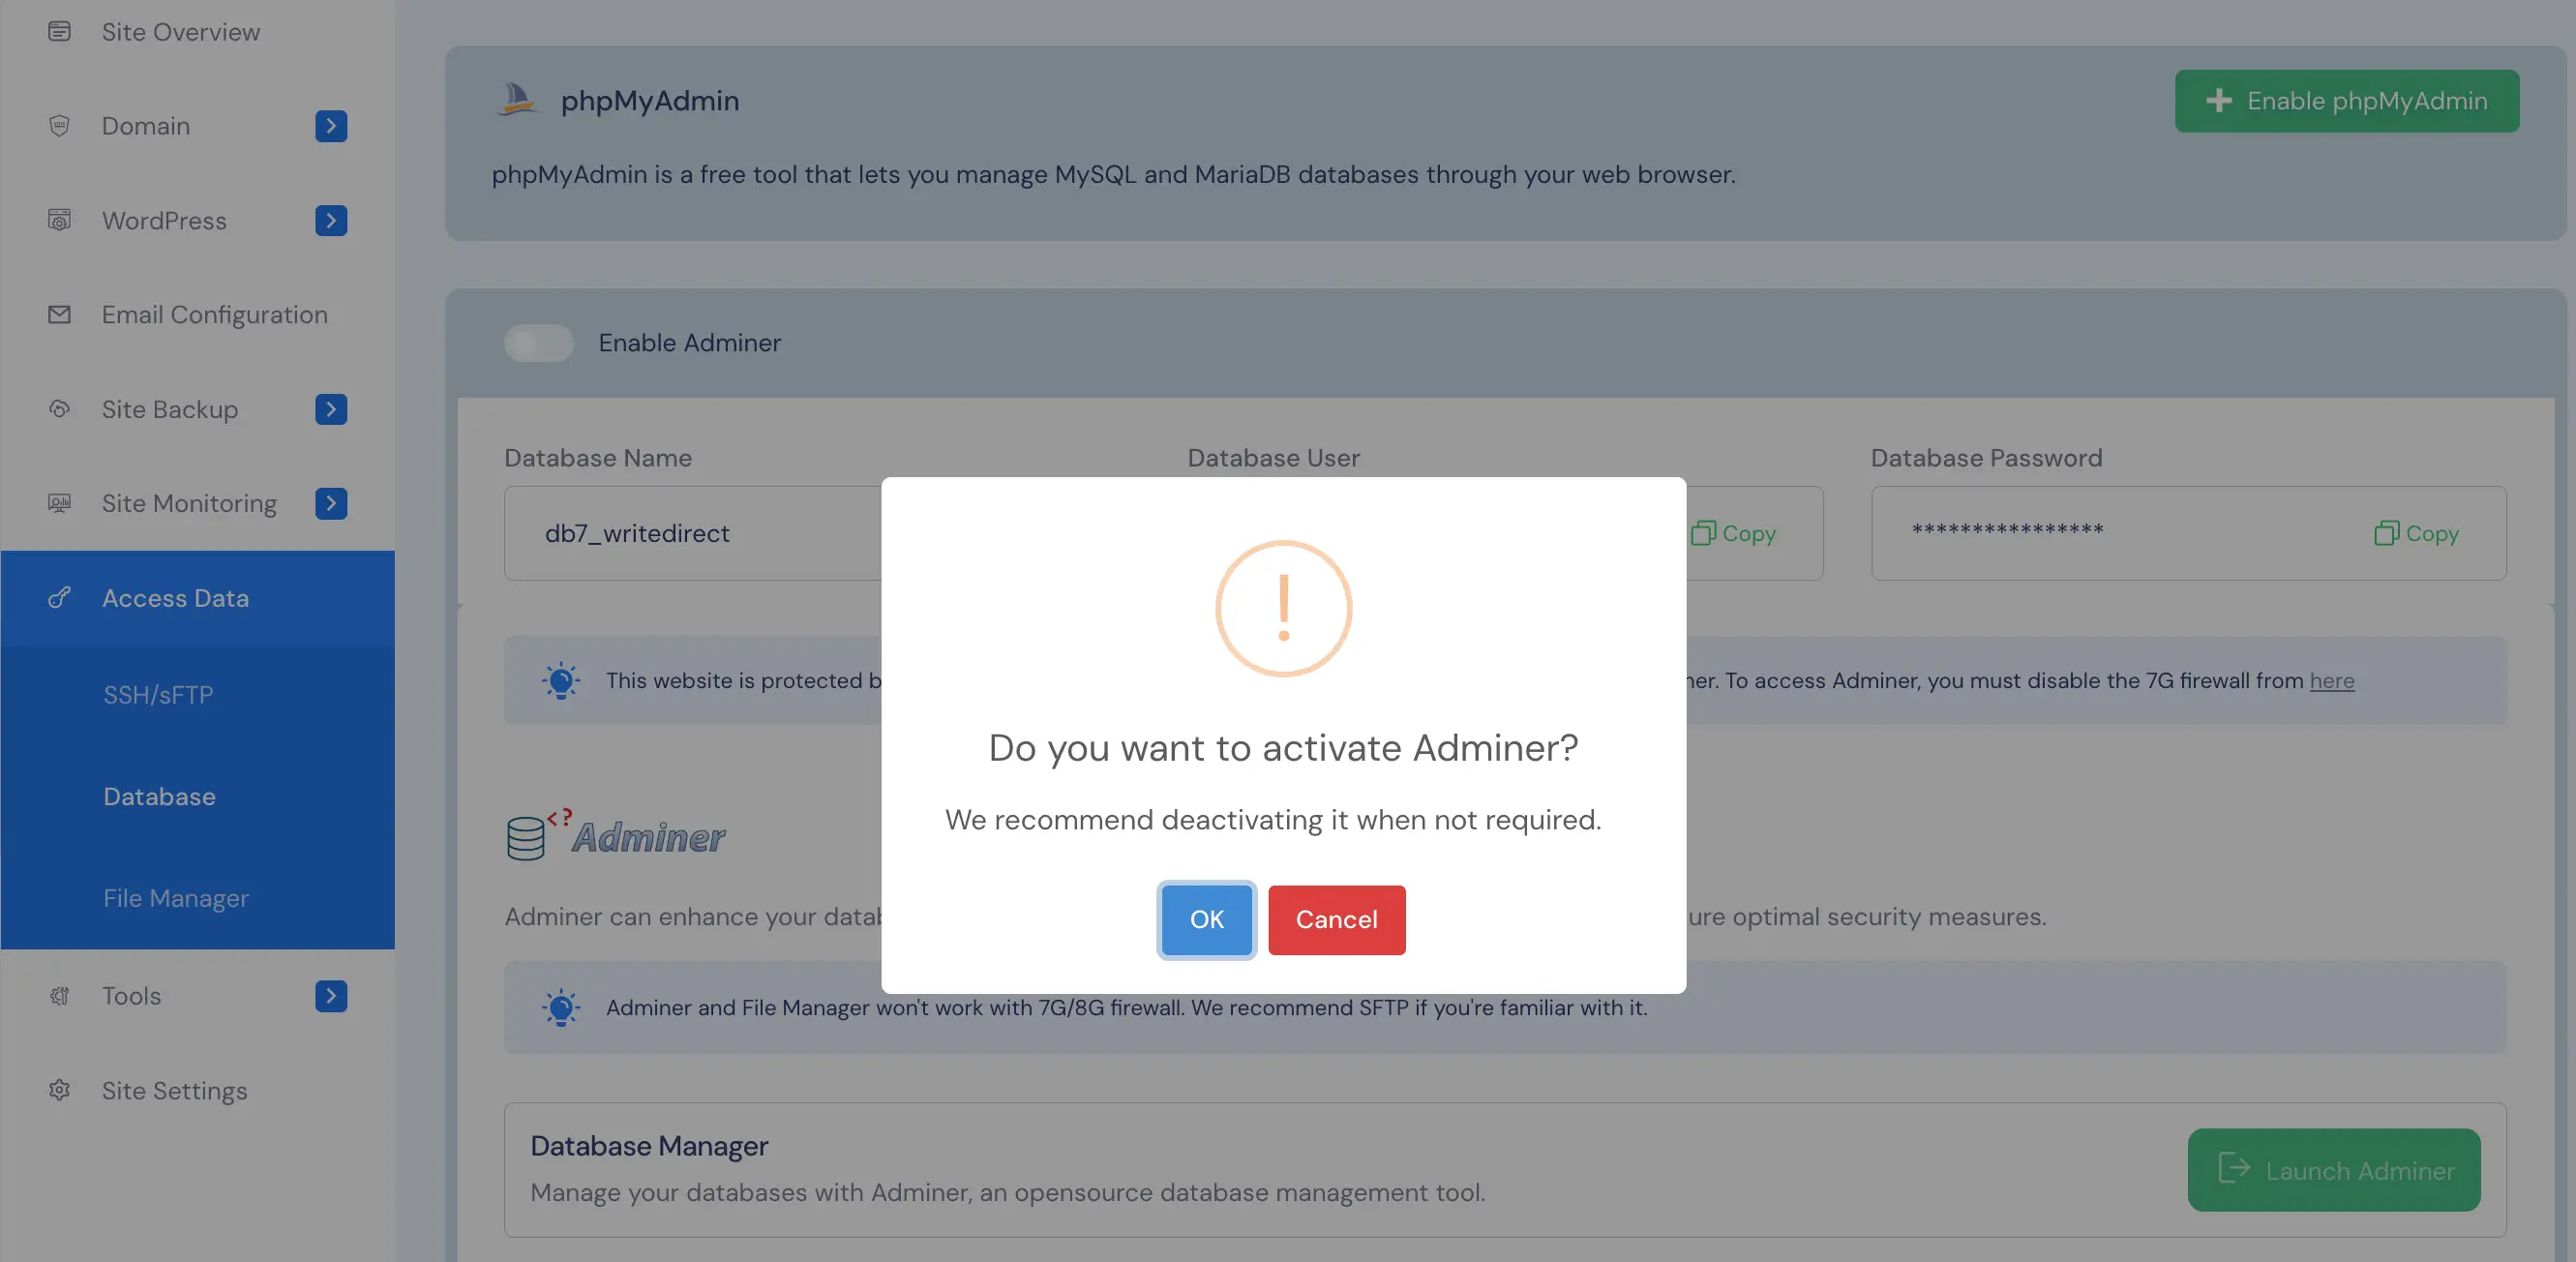
Once in Adminer look at the center column. Place a check mark by all the unused tables. So in this case NOT the tables beginning with “wp_” but the tables beginning with “era_”. Once they’re selected, choose DROP from the menu. Adminer will give a summary of the dropped tables. Choose LOG OUT, go back to your xCloud admin and disable Adminer.
*Note: If you drop the wrong tables, it’s okay. Go back into Adminer. Drop all remaining tables. Then repeat Step 10 again to import your old database. Once that’s done, redo this step.
14. Enable 7G WAF & Fail2Ban
Now that we’re done with Adminer let’s get a firewall active:
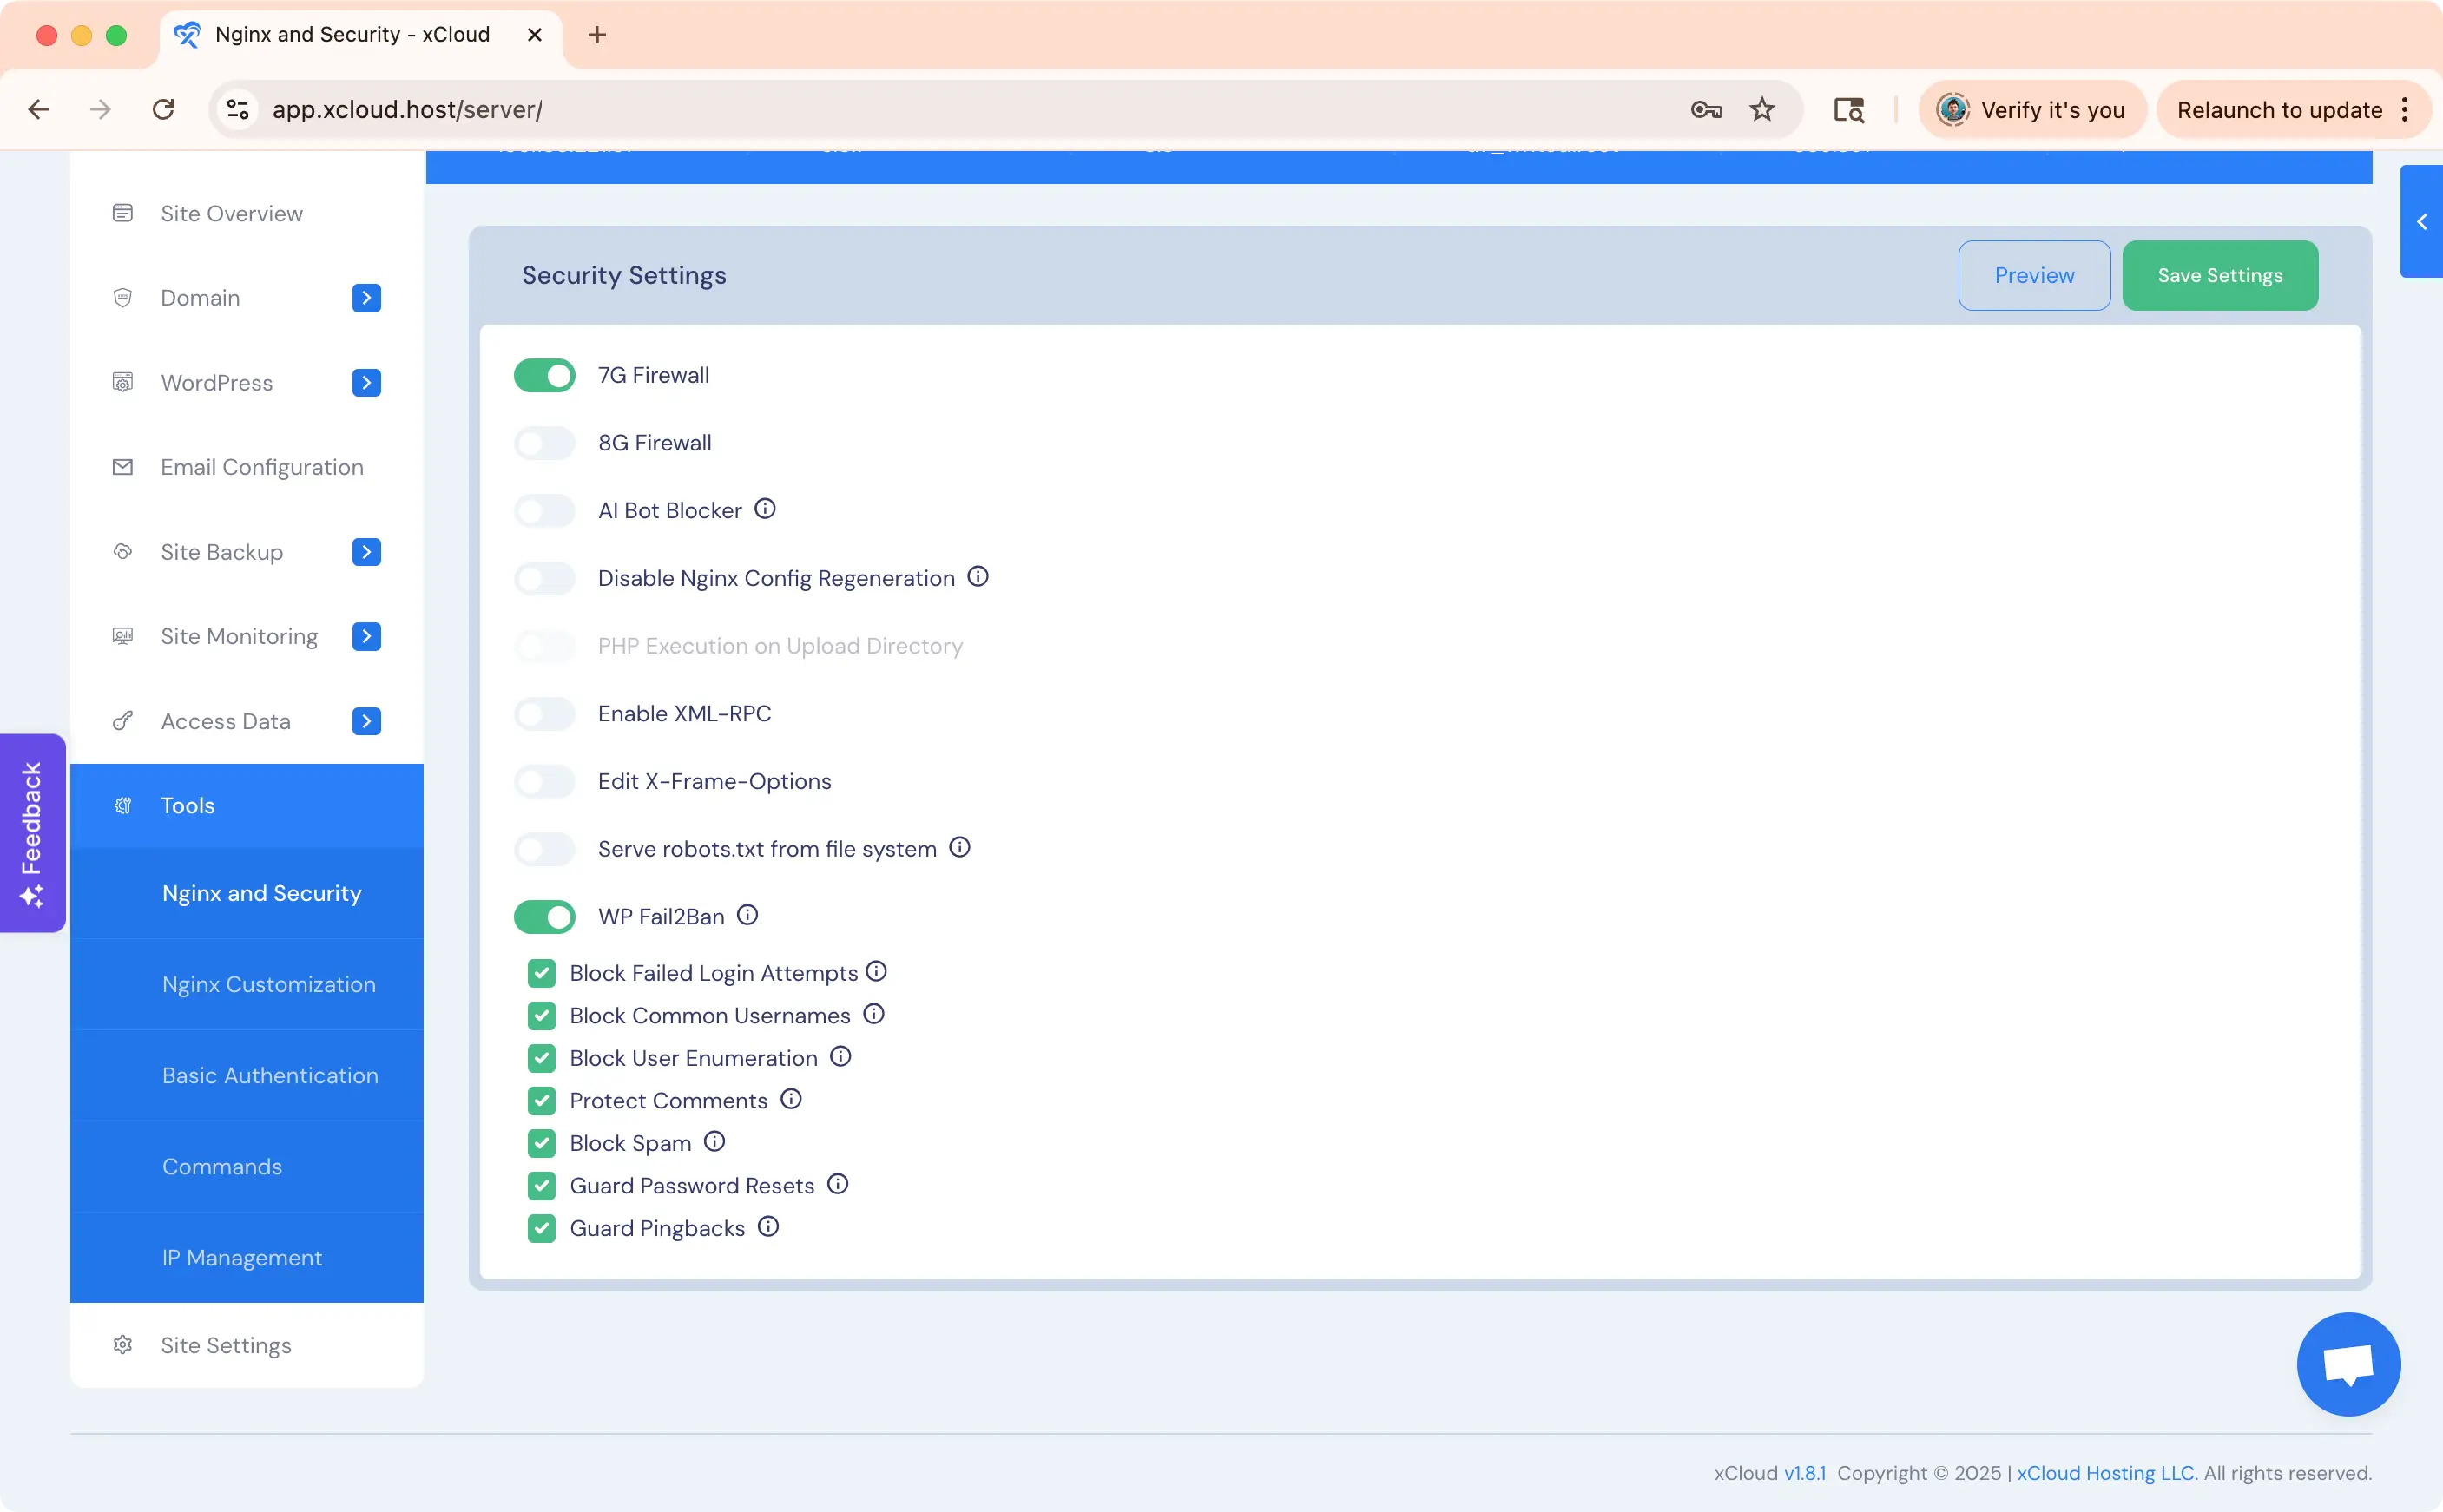
Sites > Site > Tools > Nginx and Security
Enable the 7G WAF and WP Fail2Ban with all available options underneath. Click SAVE SETTINGS here.
*Note: Why not the 8G WAF? Because it requires extra configuring to not block you from basic WP-Admin tasks. I’ll do a separate article on the 8G WAF in the near future.
15. Enable Page & Object Caching
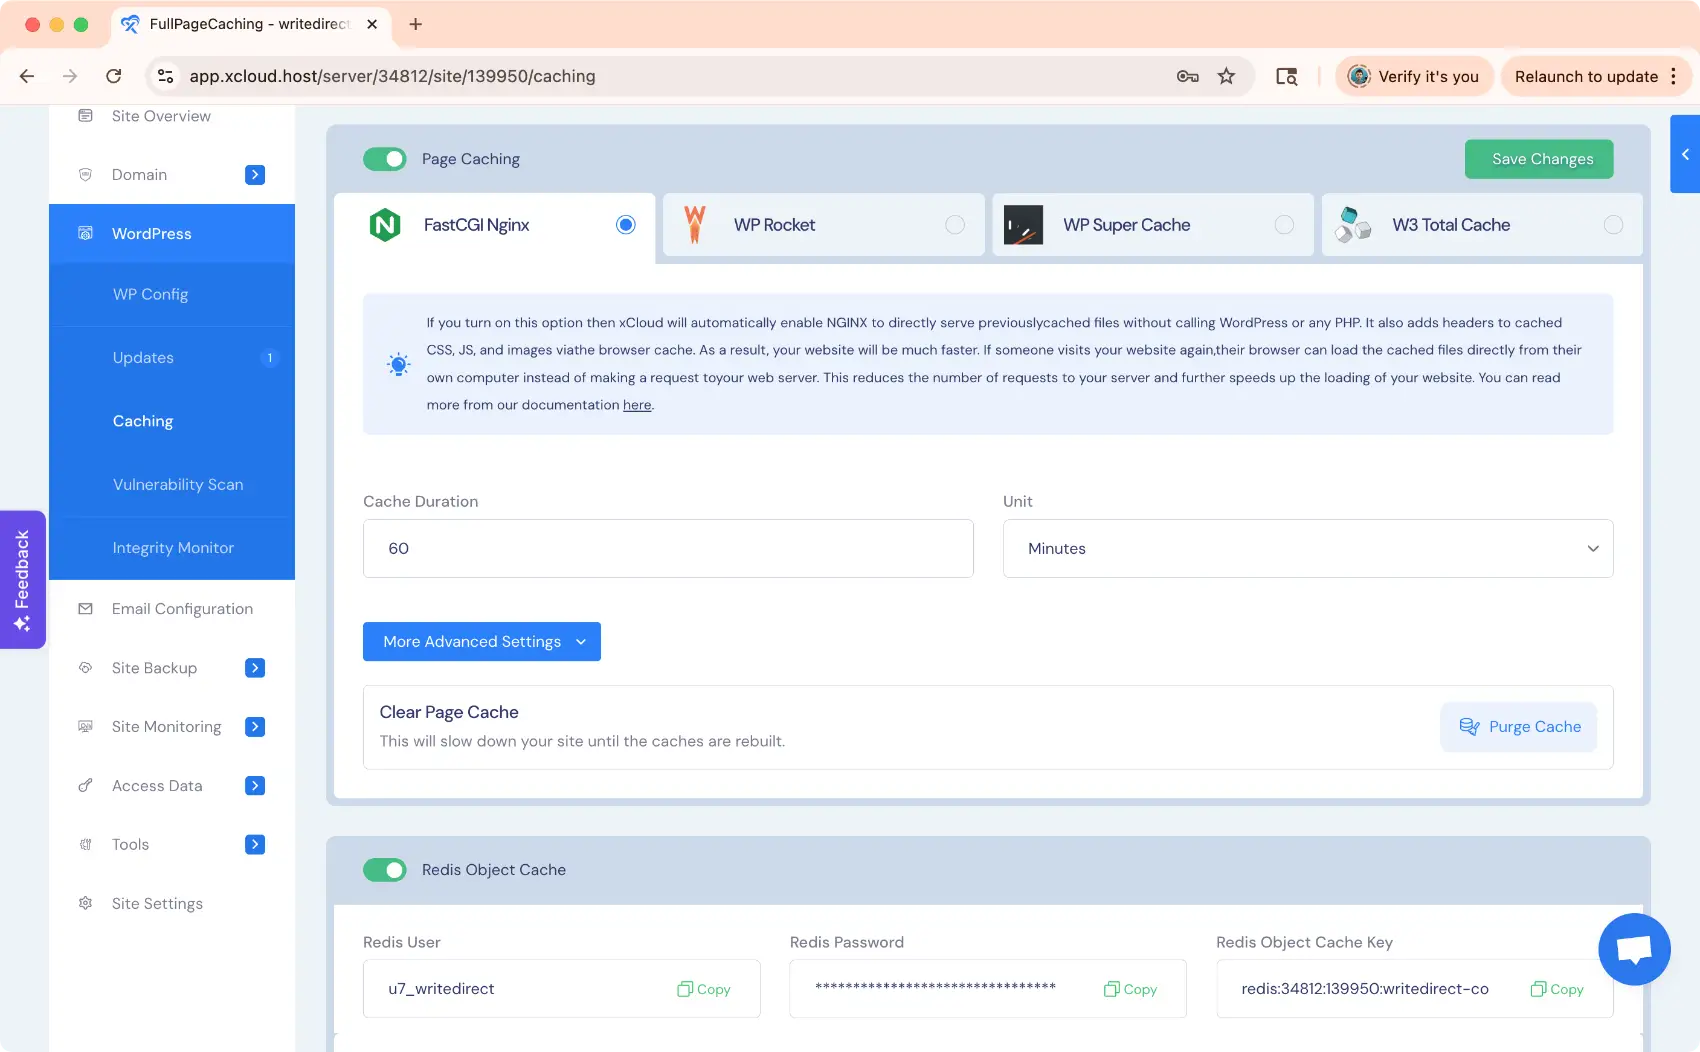
After taking care of basic security we need to make sure our site is operating quickly for both visitors and in the admin. To do this we want to enable FastCGI (Nginx Page Caching) and Redis Object Cache (admin functions, Fluent Community, etc).
Sites > Site Name > WordPress > Caching
Here you can toggle both as shown below:
16. Security Headers
Security headers are special HTTP response headers that websites use to instruct browsers on how to handle the site content more securely. When we set these headers your website can defend against common threats such as cross-site scripting (XSS), clickjacking and data injection attacks.
Cool right? To test your headers go to https://securityheaders.com. You want a scan that looks like this:
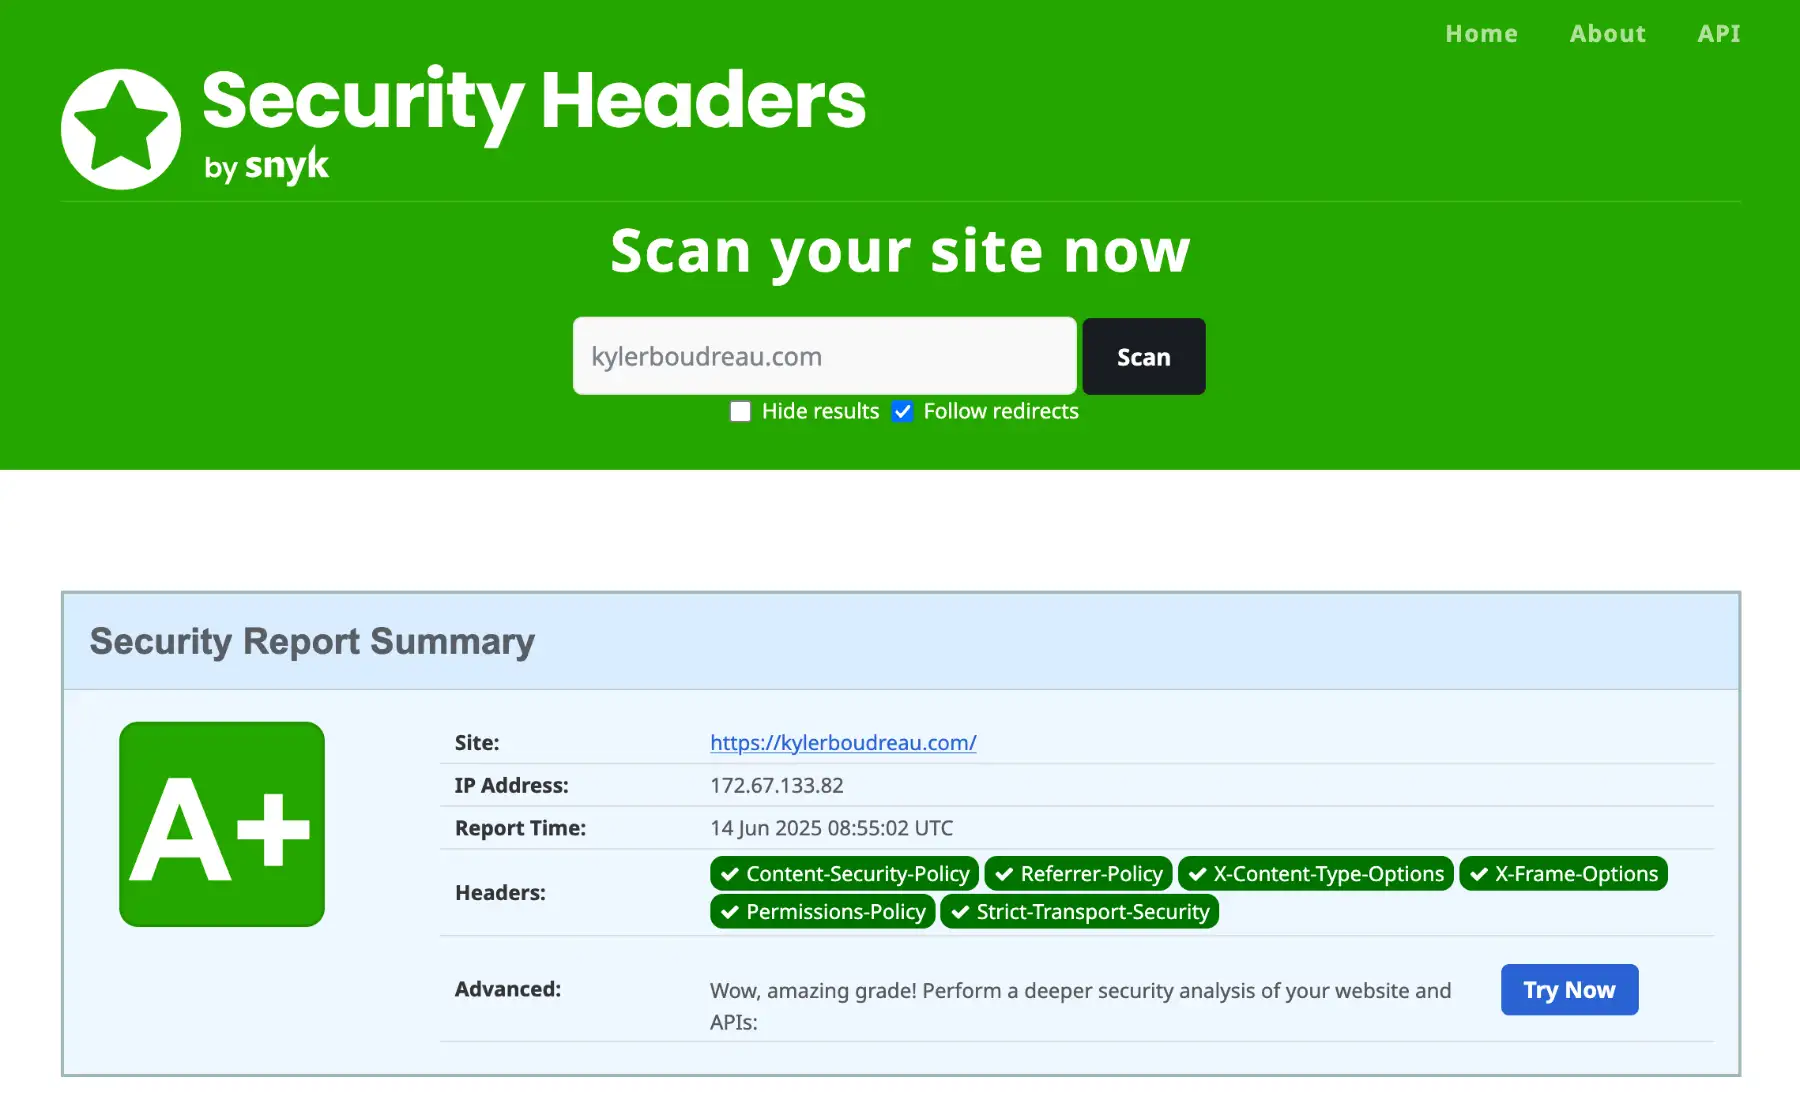
There are a variety of ways to implement security headers for your WordPress site. From editing your site’s NGINX configuration on xCloud to installing a plugin to adding them at Cloudflare.
The easiest way? Adding them to functions.php.
Below is code you can copy and paste into your functions.php file. It will get you a solid A rating if you test your site at https://securityheaders.com after implementation. This code allow for Vimeo and YouTube embeds, Stripe Payments and Google fonts:
// security headers
// these allow for Vimeo, Google Fonts, Stripe, and YouTube
add_action('send_headers', function() {
    // Generate a random nonce for each request
    $nonce = base64_encode(wp_generate_password(32, false, false));

    // Add Content-Security-Policy header with Stripe, Vimeo, Google Fonts, and YouTube support
    header("Content-Security-Policy: default-src 'self'; script-src 'self' 'unsafe-inline' 'nonce-$nonce' https://js.stripe.com https://player.vimeo.com https://www.youtube.com https://www.youtube-nocookie.com; style-src 'self' 'unsafe-inline' https://fonts.googleapis.com; img-src 'self' data: https://*.vimeocdn.com; font-src 'self' https://fonts.gstatic.com; connect-src 'self' https://api.stripe.com https://hooks.stripe.com https://vimeo.com https://*.vimeocdn.com; frame-src 'self' https://js.stripe.com https://hooks.stripe.com https://checkout.stripe.com https://player.vimeo.com https://www.youtube.com https://www.youtube-nocookie.com; object-src 'none'; base-uri 'self'; form-action 'self' https://hooks.stripe.com; upgrade-insecure-requests");

    // Add Referrer-Policy header
    header('Referrer-Policy: strict-origin-when-cross-origin');

    // Add X-Content-Type-Options header
    header('X-Content-Type-Options: nosniff');

    // Add X-Frame-Options header
    header('X-Frame-Options: DENY');

    // Add Permissions-Policy header
    header('Permissions-Policy: geolocation=(), camera=(), microphone=(), fullscreen=(self), payment=(), autoplay=()');

    // Add Strict-Transport-Security header
    header('Strict-Transport-Security: max-age=31536000; includeSubDomains');
});

// Optional: Add nonce to inline scripts (if needed)
add_filter('script_loader_tag', function($tag, $handle, $src) {
    if (strpos($tag, 'src=') !== false) {
        return $tag;
    }
    // Add nonce to inline scripts
    return str_replace('<script', '<script nonce="' . esc_attr(base64_encode(wp_generate_password(32, false, false))) . '"', $tag);
}, 10, 3);

// end security headers
*Note: It’s the Content Security portion of this that deals with specifics like Google and Vimeo, etc. If you needed to allow something else like Font Awesome or whatever, just modify the Content-Security-Policy. If you’re not sure on syntax, run it through Grok.
*Note 2: This configuration will NOT let your Fluent Community work correctly. Just comment out the Content-Security-Policy portion if you are running a Fluent Community (or other community) inside WordPress. Basically, if you add these headers and something doesn’t work, 99.9% of the time it’s the content security portion. Comment that line out and leave the others.
17. Configure Site SMTP Send
Our final step is to make sure your site can send email. Obviously there are a wide variety of ways to accomplish this. For example, I have many sites configured to use Amazon SES using the Fluent SMTP plugin. This plugin allows me to store the Amazon credentials in my wp-config file. All I need to do is copy the credentials from my old wp-config to the new and the site is instantly ready to send.
xCloud offers several options for SMTP sending capabilities. You can find them all under:
My Profile > Integrations > Email Provider.
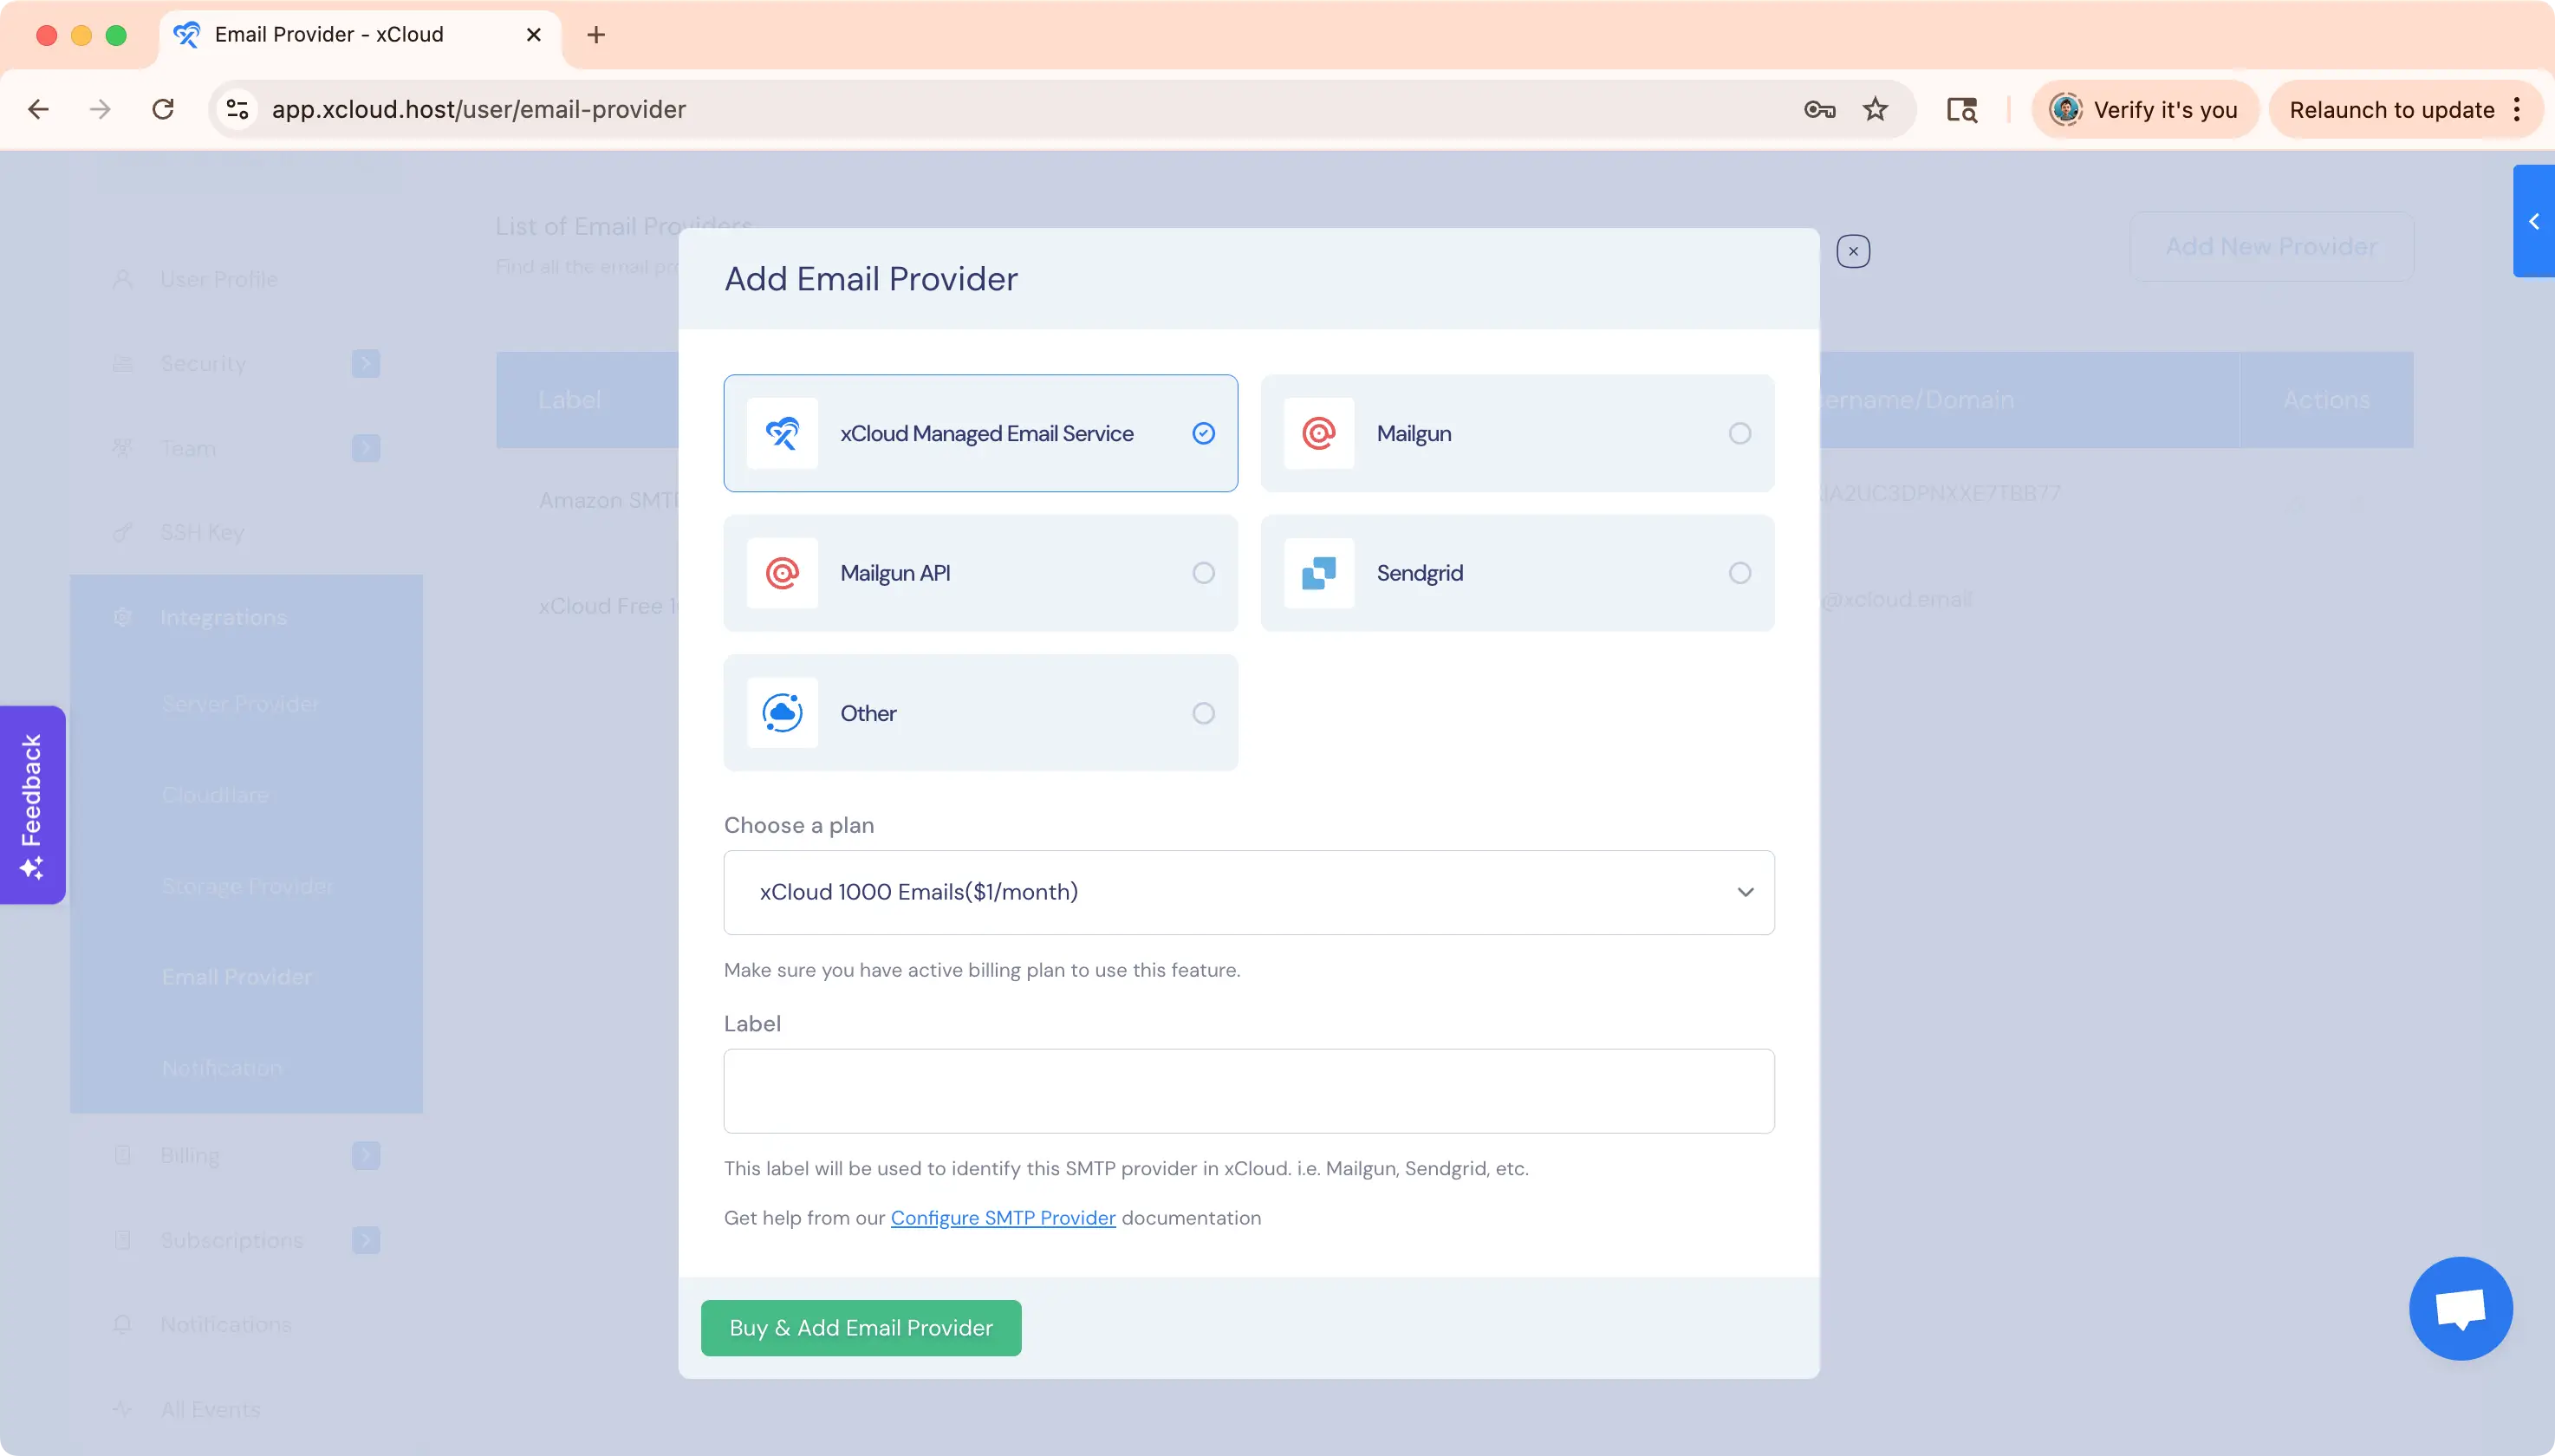
You have the xCloud Email Service, Mailgun, Sendgrid, etc. Again, I use Amazon SES and have each site sending under its own credentials. What you decide on email is up to you. But once you configure email here you can enable for your website:
Sites > Site > Email Configuration
Mission Accomplished
You did it! I know this seems like a lot of steps, but some of these steps would be required even if you used a migration plugin. And again, those plugins are fabulous when they work. But when they don’t the manual WordPress migration route is here to save your day!